# Overview
# Keycloak
Keycloak is an open source Identity and Access Management solution aimed at modern applications and services. It makes it easy to secure applications and services with little to no code.
It comes with many useful features:
- Single-Sign On
- Identity Brokering and Social Login
- User Federation
- Client Adapters
- Account Management Console
- Standard Protocols (provides support for OpenID Connect, OAuth 2.0, and SAML)
For detailed instructions and to get more know-how please visit the official keycloak documentation:
https://www.keycloak.org/documentation.html (opens new window)
# Basic Terms
Realm:
A realm in Keycloak is the equivalent of a tenant. It allows creating isolated groups of applications and users. By default there is a single realm in Keycloak called master. This is dedicated to manage Keycloak and should not be used for your own applications.
"master" and "kube-plus" exists as a realm after the default installation of kube+.
If you login as admin your landing page will be the "kube-plus" realm as long there is only one more realm than the "master" realm. Otherwise a list of existing realms will be provided.
If you want to login into a specific realm with e.g. the "kube-plus" user you can use the url /auth/admin/{realm-name}/console. As example the full url to login into keycloak and into the realm kube-plus would be https://auth.demo.kube-plus.cloud/auth/admin/kube-plus/console.
Clients:
Clients are entities that interact with Keycloak to authenticate users and obtain tokens. Most often, clients are applications and services acting on behalf of users that provide a single sign-on experience to their users and access other services using the tokens issued by the server. Clients can also be entities only interested in obtaining tokens and acting on their own behalf for accessing other services.
A client is attached to a specific realm.
"kube-plus" is a registered client within the kube-plus realm.
You could use this existing client and its secret to set up authentication/authorization for your apps.
Roles:
Roles are permissions assigned to users.
Clients uses the roles to control user’s access to its resources.
Groups:
In the Keycloak server, a group represents a collection of roles (permissions or rights). A group can be assigned any number of roles. In the assignment of roles, groups are used for collecting and structuring authorizations. It makes sense to create a group for every user department profile. For example, create groups for Operators, Supervisors, Administrators, and so on. Users are then assigned to one or more groups and therefore receive the required authorizations. The authorizations of groups are cumulative, so a user receives the sum of all authorizations of the assigned groups.
Users:
All users belong to a specific realm.
Before creating a user, make sure you first select the correct realm.
# Basic operations in Keycloak
To start using the Identity and Access Management console on kube+, open the following URL: https://auth.demo.kube-plus.cloud (opens new window)
Login in to kube+ Auth: https://auth.demo.kube-plus.cloud (opens new window)
List the existing clients
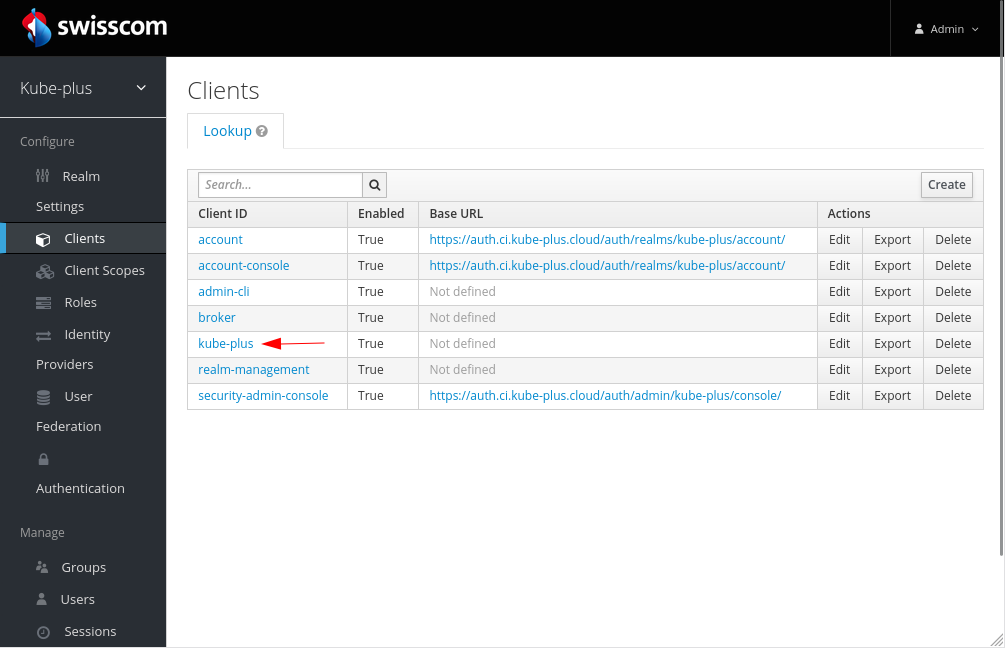
NOTE: It's recommended to create a new client
You can list and/or create new Users
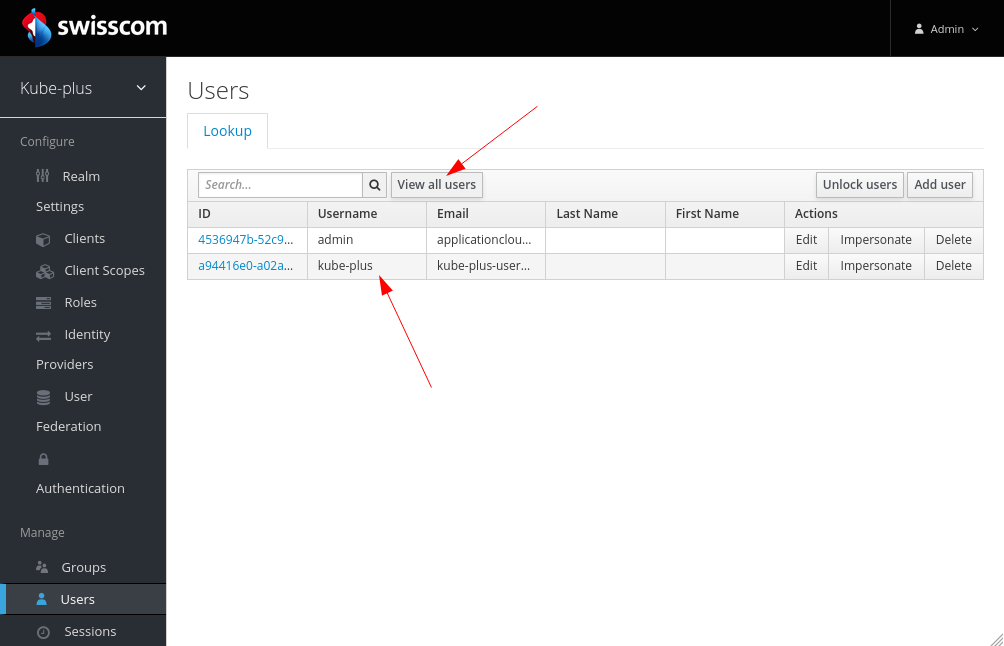
You could set a new password for a specific user. Do not change it on the UI for the
kube-plususer as its credentials are provided from the config.yml during installation. The kube-plus user is integrated with all provided components (e.g. if you want to access Grafana, ArgoCD etc. you will need to login with that User/PW ).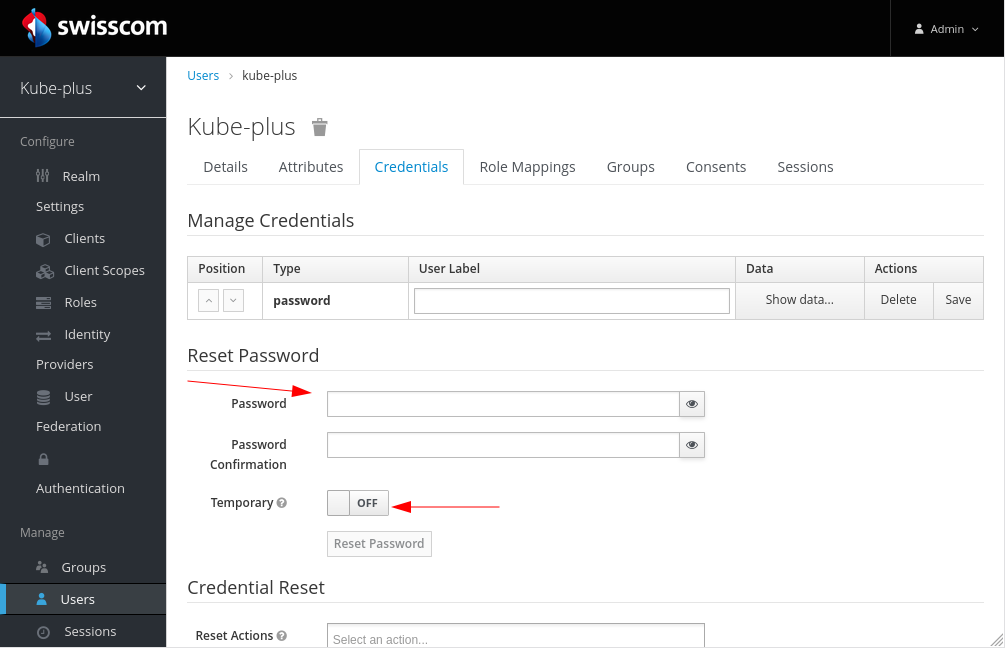
# Single Sign-On on using Keycloak
Use case - The flow from the users point of view:
- A user visits the application on a browser and tries to access protected resources.
- The application redirects the user to the Keycloak login page.
- The user enters the username and password.
- Keycloak authenticates the user.
- If the authentication succeeds, Keycloak redirects the user to the protected resources of the application.
- Profit from SSO on requesting other proteced applications with the existing valid authentication and authorization without any login procedure again.
# SSO on kube+ management ressources (*.system-domain)
Most of the kube+ management components are already configured with an OIDC integration either with Keycloak directly (Harbor, Argo CD) or on behalf of a further integrated component called Pomerium (opens new window) which provides a SSO gateway to Keycloak for this applications (like Grafana, Prometheus, Dashboard, etc.).
A common use case is to add or bind a further Identy Provider to Keycloak so users can login from external or internal IDP's. Keycloak would then delegate the authentication to this provider.
See in the section How-To for a common IDP integration.
# SSO on kube+ workload ressources (*.app-domain)
At the moment on kube+ there is no SSO "service" running which can be consumed easely and without further code change on application workload level*.
An approach could be to setup an oauth2-proxy to cover all workload endpoints or only some specific with using a sidecar.
On the How-To section you will find an example with such a solution and with having a oauth2-proxy as a sidecar in the nginx pod.
There might be solutions which fits better for a specific use-case.
There is one caveat:
The ingress controller Contour (opens new window) is used on kube+ and to support knative features to deploy your workload. Depending what solution you choose it could impact the use of the knative deployment approach.
*Hint: "You could add an app to the system-domain to gain SSO"
It would be possible to add a workload endpoint to the Pomerium configuration and to profit of the existing SSO setup for the system-domain components like described further above.
Per default this would lead to have the system-domain for this endpoint to be used and on the other side you have to take care this endpoint will be integrated into the global kube+ deployment configuration.
Keycloak describes the basic steps to secure applications and services like this:
- Configure a client using one of these options:
- A Keycloak adapter
- A generic OpenID connect or SAML library
- Register a client using one of these options:
- The Keycloak Admin Console e.g. https://auth.demo... (opens new window)
- The client registration service client registration (opens new window)
- The CLI client registration cli (opens new window)
More or general documentation related to SSO:
Keycloak documentation - Securing Apps:
Using OIDC to secure apps (opens new window)
Keycloak documentation - Server Administration:
Managing Clients (opens new window)
Keycloak documentation - Server Administration: SSO protocols (opens new window)
# Autorization Code Grant / Access Token with OIDC
To get an access token from the Keycloak authorization server you will use the OAuth authorization code grant flow.
This authorization flow can be used if your application supports redirects.
A registered client (OAuth client) is used to request the OAuth authorization code.
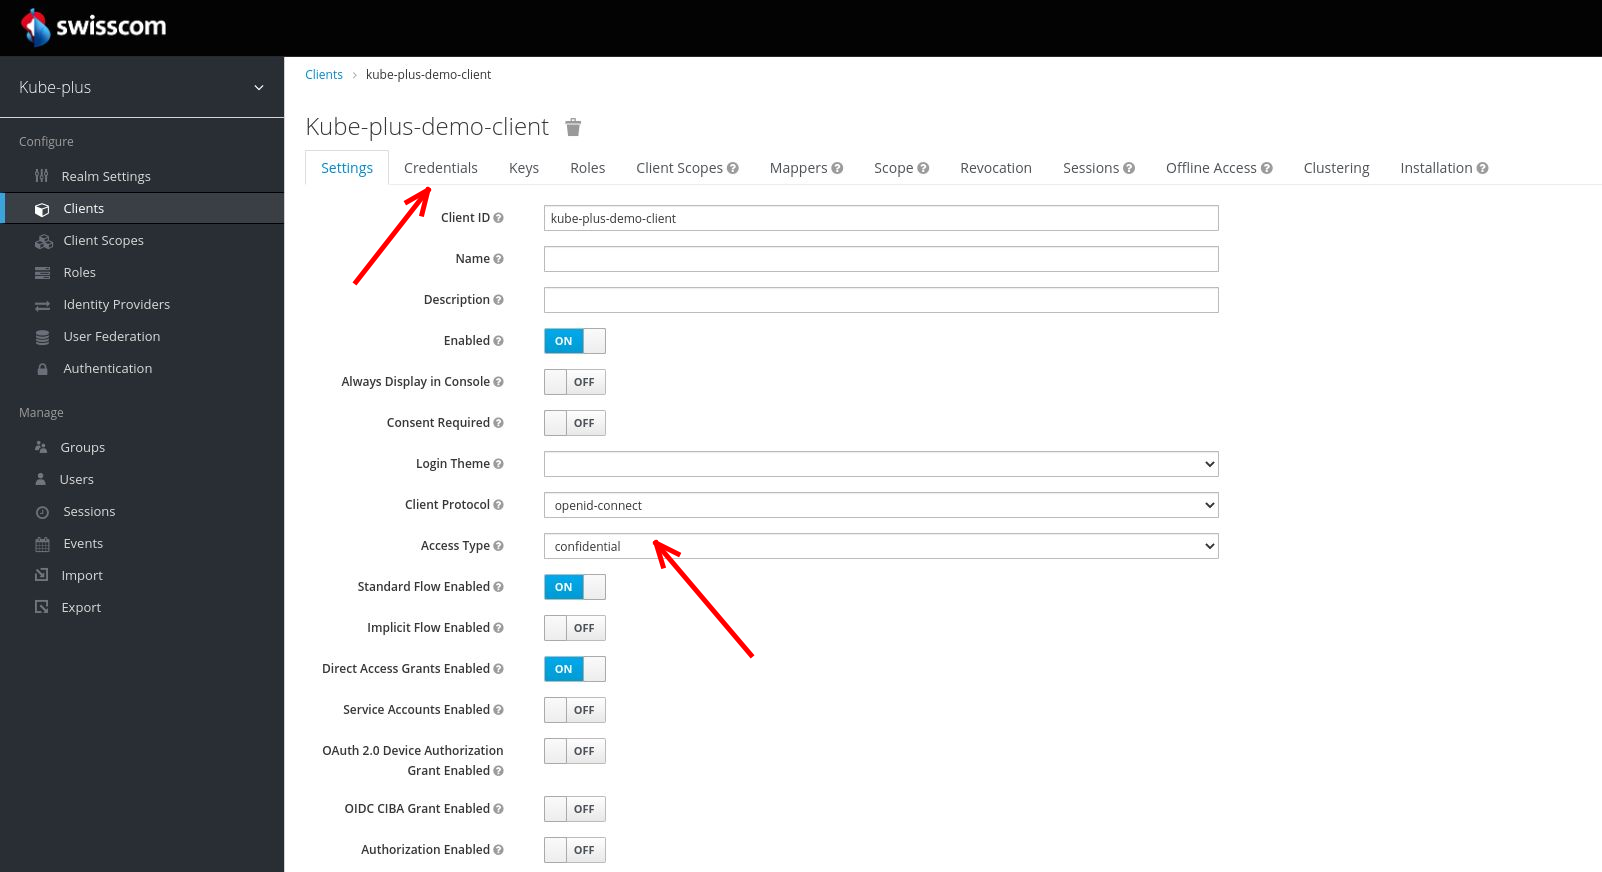
The "Standard Flow" is enabled for the OAuth client.
The "Credentials" tab with a generated secret will be shown only after you have set the "Access Type" to "confidential" and saved this change.
Hint: The OIDC .well-known endpoint will list endpoints (e.g. auth, token, etc.) and other configuration options. The mentioned "oaut2-proxy" above makes use of this endpoints obtained through this well-known endpoint.
curl https://auth.demo.kube-plus.cloud/auth/realms/kube-plus/.well-known/openid-configuration
For further information please have a look into: Keycloak OIDC generic (opens new window)
An example of an url request in the browser to obtain an OAuth authorization code for the client would look like this:
https://auth.demo.kube-plus.cloud/auth/realms/kube-plus/protocol/openid-connect/auth
?client_id=kube-plus-demo-client
&response_type=code
&redirect_uri=https://..../callback
In the case of a successful request and authentication, the authorization server will generate the authorization code and will redirect the client application to a Redirect URI configured in the Keycloak server on this OAuth client. The redirect_uri from the request therefore has to match to a defined redirect uri on keycloak.
The authorization "code" will then be invoked to get an "Access Token".
An example of a curl command could look like this:
curl -X POST https://auth.demo.kube-plus.cloud/auth/realms/kube-plus/protocol/openid-connect/token \
-H 'Content-Type: application/x-www-form-urlencoded' \
-d 'grant_type=authorization_code' \
-d 'client_id=kube-plus-demo-client' \
-d 'client_secret=12345121232132121212' \  #setting on Credentials for the client
-d 'code=4343243254545425425425.4545.5525.542.52....' \  #received Authorization Code
-d 'redirect_uri=https://..../callback'
If the request was successful, a response contains an access token and a refresh token. The access token can then further invoked with the "Authorization: bearer $TOKEN".
# PKCE on Keycloak
PKCE stands for Proof Key for Code Exchange and the PKCE-enhanced authorization code flow builds upon the standard Authorization Code Flow (opens new window).
This authorization flow provides an additional level of security for public OAuth clients.
Configure PKCE in Keycloak
If you want to use the PKCE-enhanced Authorization Code flow, the OAuth client in keycloak needs to have an additional configuration.
On the Keycloak UI within "Clients"
- The OAuth client application "Access type" needs to be "public" and the "Standard flow Enabled" needs to be "enabled".
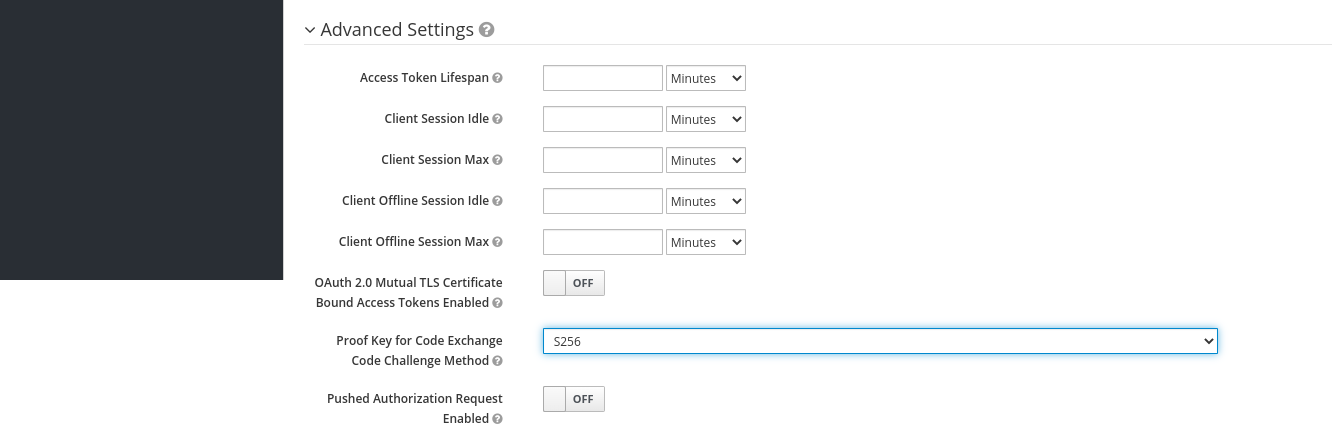
- Further down the page you will find the "Advanced Settings" section.
For the "Proof Key for Code Exchange Code Challenge Method" option select "S256" as challenge method.
How does it work
Compared to the url request mentioned further above without PKCE it needs now two additional request parameters. The "code_challenge" and the PKCE code_challenge_method we have been set for that client.
The url on the browser for the client would now look like this:
https://auth.demo.kube-plus.cloud/auth/realms/kube-plus/protocol/openid-connect/auth
?client_id=kube-plus-demo-client
&response_type=code
&redirect_uri=https://..../callback
&code_challenge=0Qu2xJuxKTwfjWcUo0pqCtJGj_6MShMHAXaTI5UUyrk   #see https://tools.ietf.org/html/rfc7636#page-8
&code_challenge_method=S256
Our curl command mentioned above without PKCE and to obtain an access token would also now have an additional request parameter "code_verifier":
curl -X POST https://auth.demo.kube-plus.cloud/auth/realms/kube-plus/protocol/openid-connect/token \
-H 'Content-Type: application/x-www-form-urlencoded' \
-d 'grant_type=authorization_code' \
-d 'client_id=kube-plus-demo-client' \
-d 'client_secret=12345121232132121212' \  #setting on Credentials for the client
-d 'code=4343243254545425425425.4545.5525.542.52....' \  #received Authorization Code
-d 'redirect_uri=https://..../callback'
-d 'code_verifier=xYlnZ9qpZjj3WRuLg.jgMW938I6wj5kVGcEOfs~LacRj9bIOJ7mggDYamQrI-Qmc1OW.YjBpM6f0u.IMAsH1.zTrr5JB4.293yBWq2dcbkgO~hD2YQ9pIa7-Ygr5sFAI'   #see https://tools.ietf.org/html/rfc7636#page-8
- When the user wants to authorize, the client generates a secret called code_verifier, hashes it with SHA256 and sends this as code_challenge to the auth endpoint.
- The server redirects the user to the login/authorization prompt.
- The user enters his credentials, and after a successful login, the authorization "code" will be returned.
- The client sends the authorization "code" and the "code_verifier" to the autorization server.
- The autorization server validates the code_verifier with the already received code_challenge and the authorization code. If correct, it returns the Id-Token and the Access-Token, which the user can use to authorize on a resource.
This prevents an attacker from code injection on the user’s browser. Before, the attacker could intercept the call after retrieving the authorization code and get an access token with the user’s authorization code. With PKCE, the attacker doesn’t know the code_verifier and won’t get an access token from the authorization server.