# Azure DNS
You can configure Azure DNS to resolve host names in your public domain. For example, if you purchased the contoso.xyz domain name from a domain name registrar, you can configure Azure DNS to host the contoso.xyz domain and resolve www.contoso.xyz to the IP address of your web server or web app.
NOTE: Be aware that Azure is not a domain registrar. You can use Azure DNS to host a DNS zone and manage the DNS records for a domain in Azure.
In Azure DNS you need to setup an A- and a CNAME-Record for the system_domain.
# Create DNS Zone
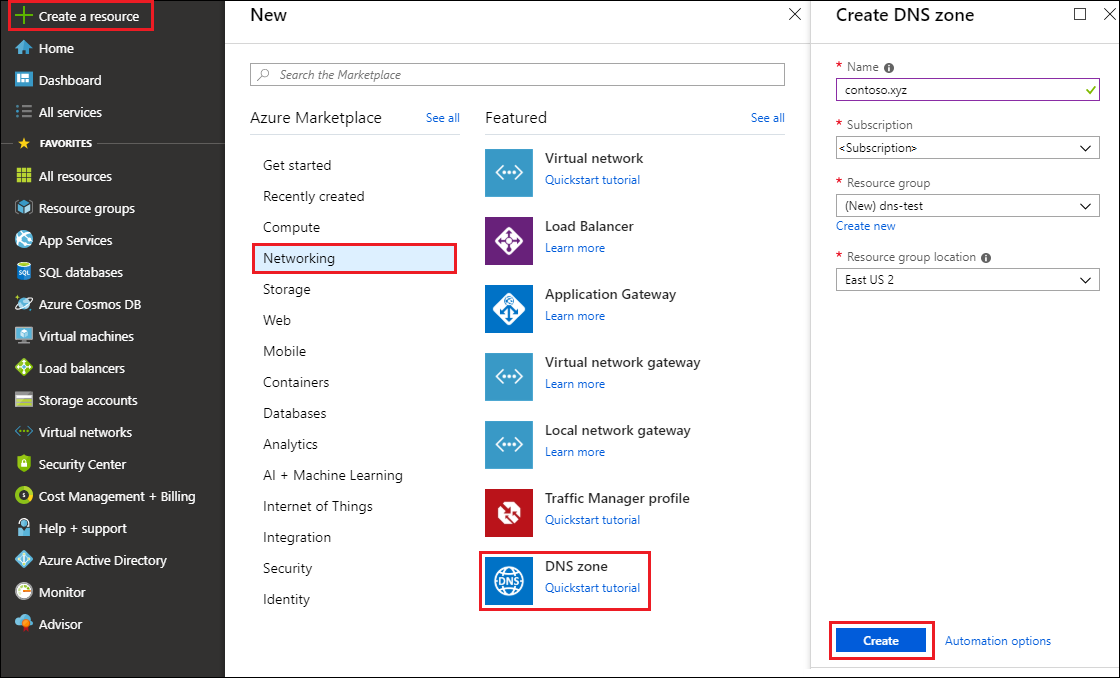
At upper left, select Create a resource, then Networking, and then DNS zone.
On the Create DNS zone page, type or select the following values:
- Name: Type the specified domain from your configuration. The DNS zone name can be any value that is not already configured on the Azure DNS servers. A real-world value would be a domain that you bought from a domain name registrar.
- Resource group: Select Create new, enter the name you defined in Configuration Example Azure
azure.dns.resource_group, and select OK. The resource group name must be unique within the Azure subscription.
Select Create
It may take a few minutes to create the zone.
# Create the DNS Records
In order to be able to reach your system components and/or your workload running under the system domain, you need to create two records. An A-Record and a CNAME Record.
In the Azure portal, under All resources, open the DNS zone you just created in your new resource group. You can enter your domain in the Filter by name box to find it more easily.
# System Domain
# Create an A-Record
At the top of the DNS zone page, select + Record set.
On the Add record set page, type or select the following values:
Name: the name of your previously defined system_domain, e.g. demo.kube-plus.cloud. The record name is the host name that you want to resolve to the specified IP address.
Type: Select A. A-Records are the most common, but there are other record types for mail servers ('MX'), IP v6 addresses ('AAAA'), and so on.
TTL: Choose a value. Time-to-live of the DNS request specifies how long DNS servers and clients can cache a response.
IP address: IP Adress of your system domain loadbalancer (you can get this IP address by executing the command below against your k8s cluster)
$ kubectl -n contour-external get svc/envoy -o jsonpath='{.status.loadBalancer.ingress[0].ip}'Select OK.
# Create a CNAME-Record
At the top of the DNS zone page, select + Record set.
On the Add record set page, type or select the following values:
Name: the name of your previously defined system_domain with an asteriks (*) in front, e.g. *.demo.kube-plus.cloud.
Type: Select CNAME.
TTL: Choose a value. Time-to-live of the DNS request specifies how long DNS servers and clients can cache a response.
Alias: the name of your previously defined system_domain , e.g. demo.kube-plus.cloud
Select OK.
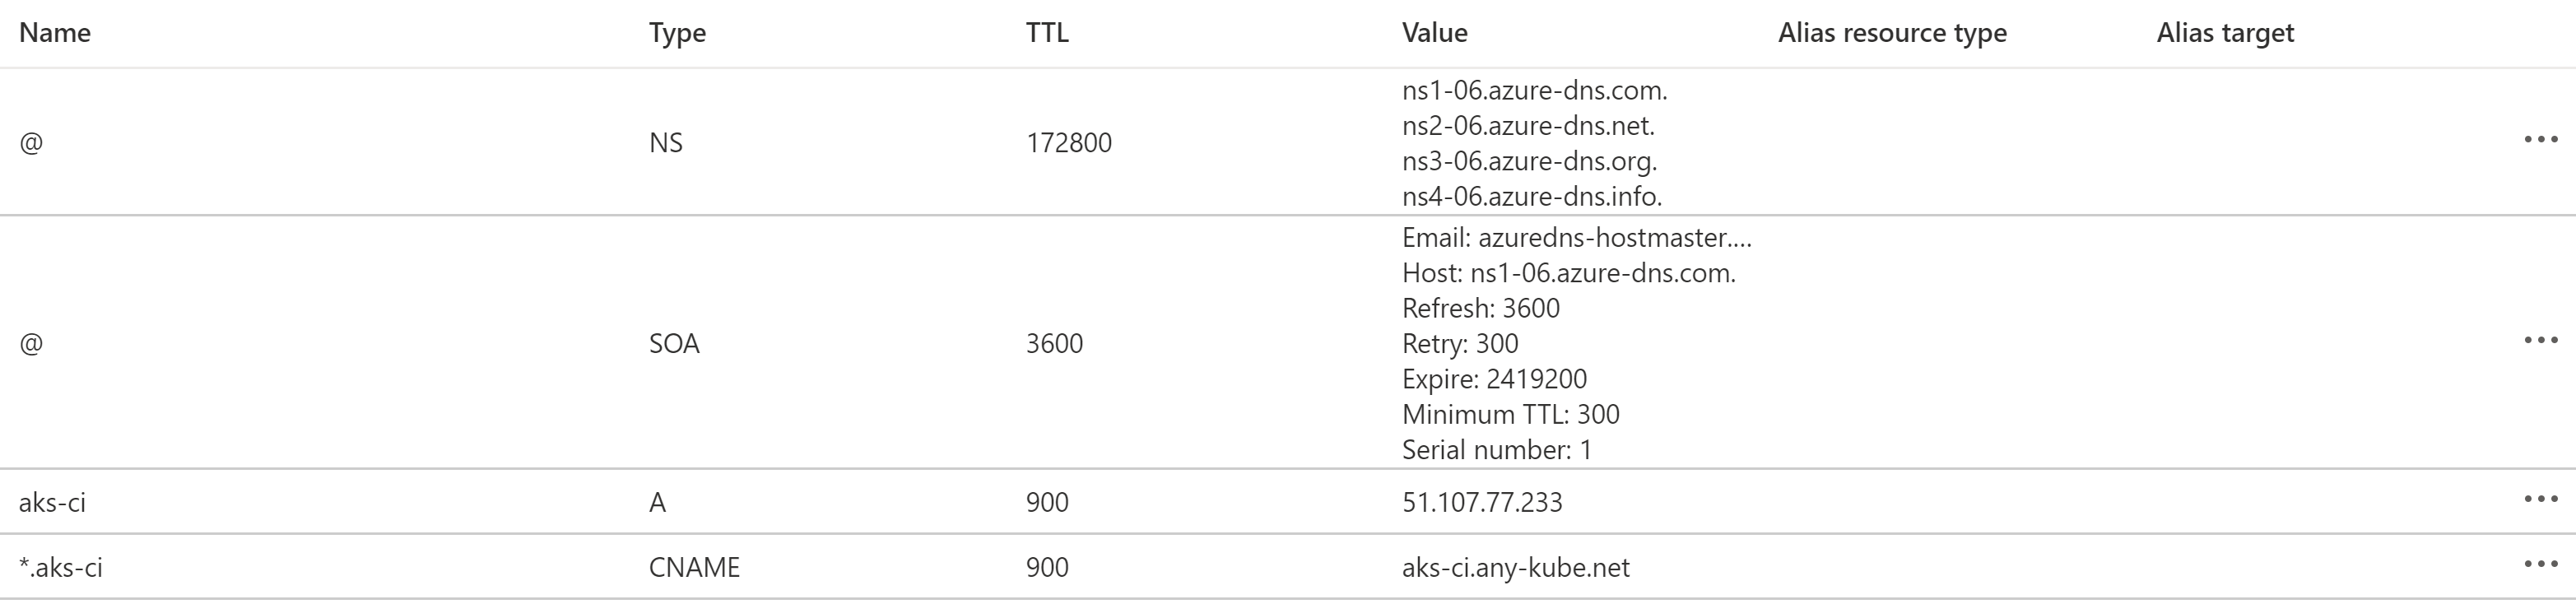
# Example records
Here is an example of a fully configured kube+ DNS record set on Azure DNS.
In this example the IP 51.107.77.233 is the IP of the Kubernetes loadbalancer for the system_domain:
kubectl -n contour-external get svc/envoy -o jsonpath='{.status.loadBalancer.ingress[0].ip}'
# Test your records
Now that you have a test DNS zone with a test A-Record, you can test the name resolution with a tool called nslookup.
To test DNS name resolution:
In the Azure portal, under All resources, open the previously created DNS zone in the also newly created resource group.
Copy one of the name server names from the name server list on the Overview page.
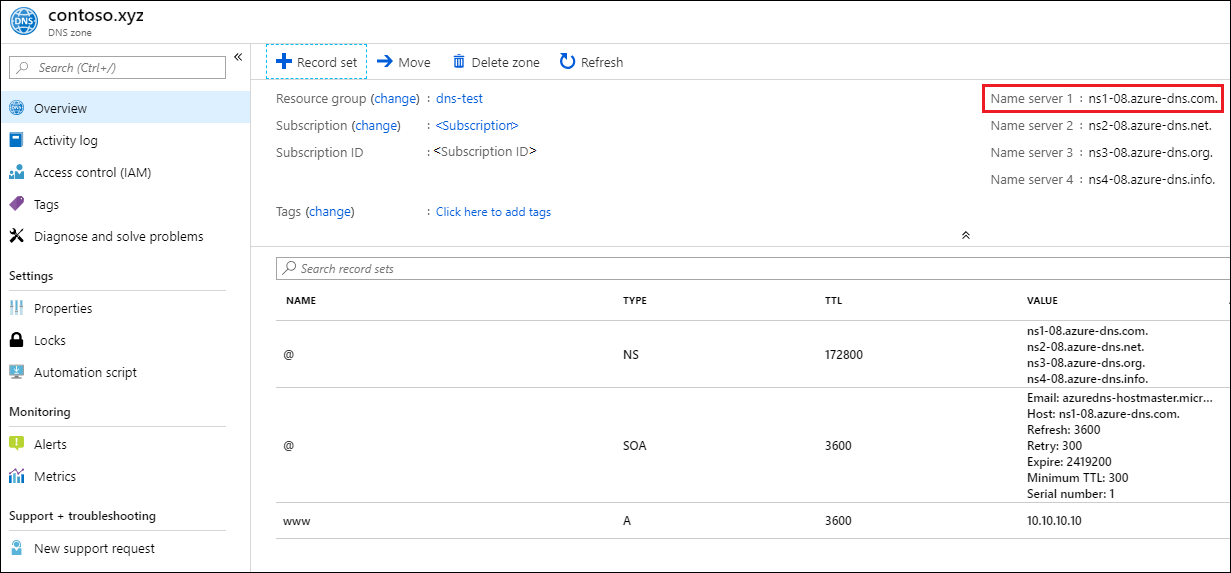
Open a command prompt, and run the following command (or alternatively with dig):
nslookup www.your-example.xyz <server you just copied>for example:
nslookup www.contoso.xyz ns1-08.azure-dns.com.
The host name www.your-example.xyz resolves to your IP, just as you configured it. This result verifies that name resolution is working correctly.
# Programmatically add DNS entries
In the following section there are example scripts to programmatically add the necessary DNS entries.
NOTE: Make sure your are logged into azure with
az login.
NOTE: Make sure your are logged into the correct k8s cluster before you execute the shell script and
kubectlcommands!
To add the system_domain DNS entry, use the shell script below.
system_domain DNS entry (Click to expand)
export RESOURCE_GROUP=$(check the config property azure.dns.resource_group in the config.yml)
export HOSTED_ZONE=$(check the config property azure.dns.hosted_zone in the config.yml)
export SYSTEM_DOMAIN=$(check the config property system_domain in the config.yml)
export SYSTEM_DOMAIN_LB=$(kubectl -n contour-external get svc/envoy -o jsonpath='{.status.loadBalancer.ingress[0].ip}')


#echo "create Azure DNS entries ..."
az network dns record-set a add-record --resource-group ${RESOURCE_GROUP} --zone-name ${HOSTED_ZONE} --record-set-name "${SYSTEM_DOMAIN%.${HOSTED_ZONE}*}" --ipv4-address ${SYSTEM_DOMAIN_LB} --ttl 900 | grep 'Succeeded'
az network dns record-set cname set-record --resource-group ${RESOURCE_GROUP} --zone-name ${HOSTED_ZONE} --cname  "${SYSTEM_DOMAIN}" --record-set-name "*.${SYSTEM_DOMAIN%.${HOSTED_ZONE}*}" --ttl 900 | grep 'Succeeded'

# echo "querying Azure DNS ..."
az network dns record-set a show --resource-group ${RESOURCE_GROUP} --zone-name ${HOSTED_ZONE} --name "${SYSTEM_DOMAIN%.${HOSTED_ZONE}*}" | grep ${SYSTEM_DOMAIN}
az network dns record-set cname show --resource-group ${RESOURCE_GROUP} --zone-name ${HOSTED_ZONE} --name "*.${SYSTEM_DOMAIN%.${HOSTED_ZONE}*}" | grep "*.${SYSTEM_DOMAIN}"
- Check out this config property for the
azure.dns.hosted_zone. - Check out this config property for the
azure.dns.resource_group. - Check out this config property for the
system_domain.